Baby Panda Crochet Pattern – Cute Amigurumi Panda
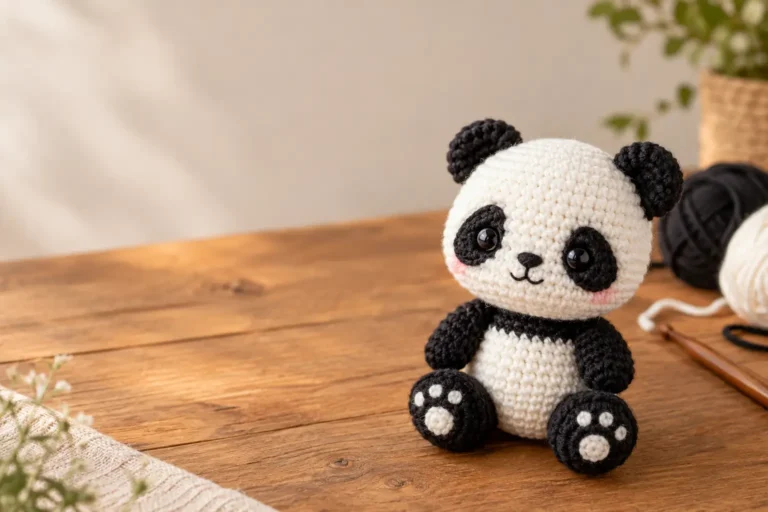
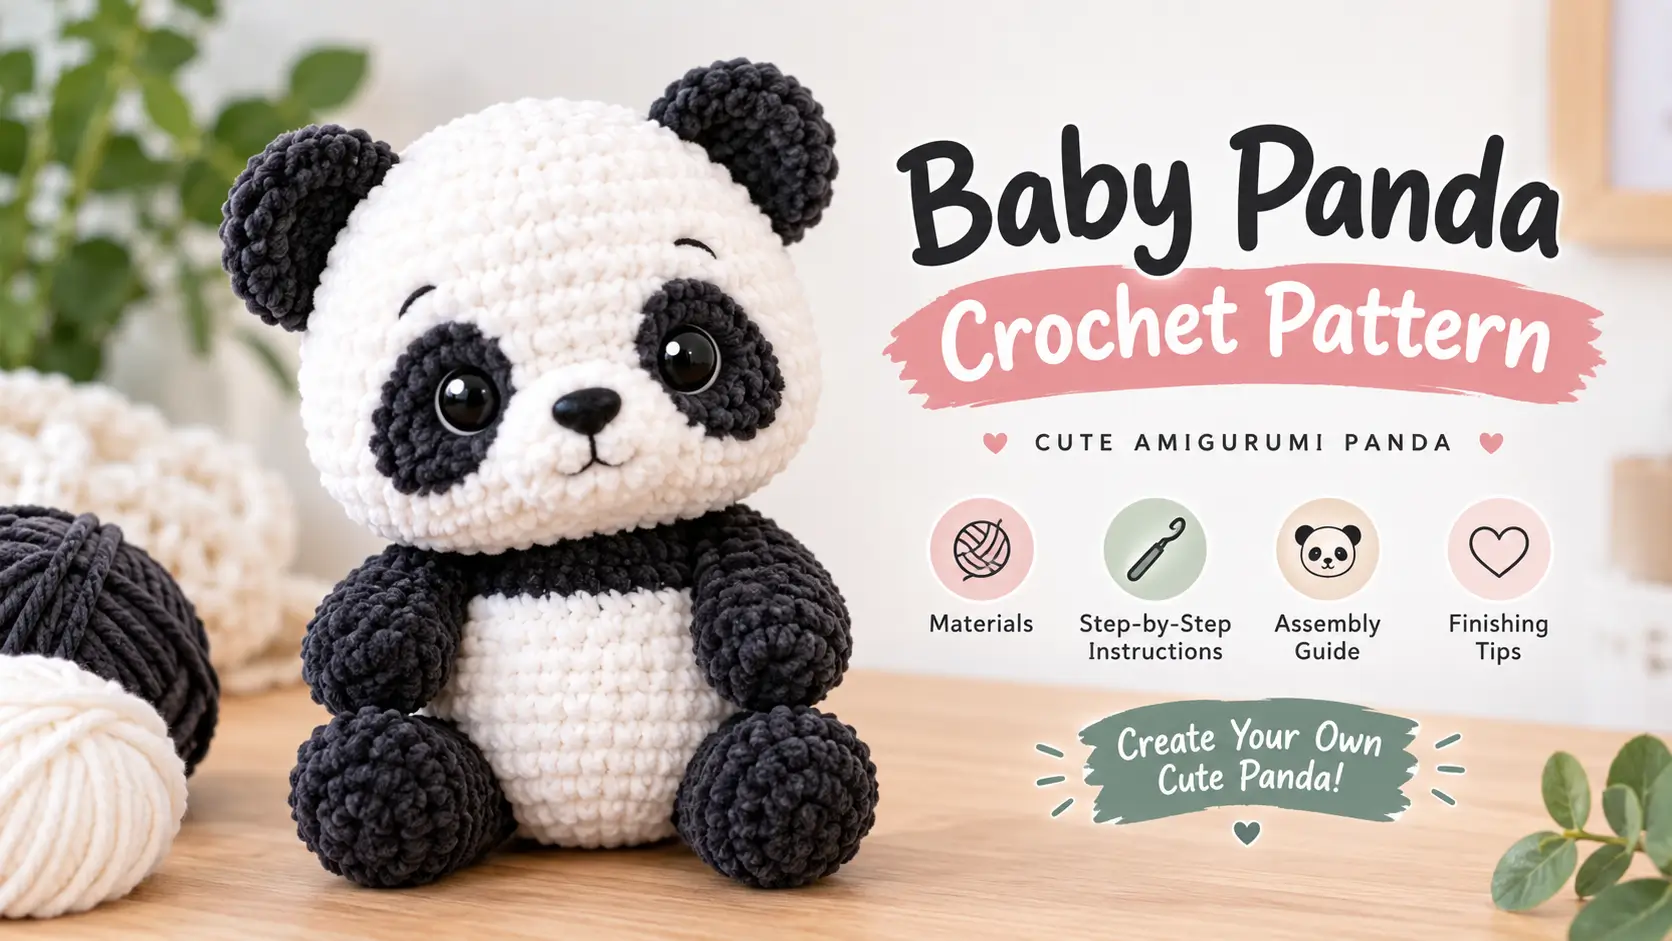
Looking for a cute and cuddly crochet project? This Baby Panda Crochet Pattern is a lovely amigurumi project for crocheters who enjoy making soft plush animals. If you love panda-themed makes, don’t miss our Panda Dad Crochet Pattern and our other Crochet Panda Pattern for more ideas to grow your panda family.
This adorable panda is crocheted using plush velvet yarn and features a sweet rounded face, little ears, chunky legs, arms, and a small tail. The finished toy is approximately 20 cm tall, although the final size can vary depending on your yarn, hook size, gauge, and crochet technique.
Table of Contents
Baby Panda Crochet Pattern Details
- Project: Baby Panda Amigurumi
- Type: Crochet Plush Toy
- Approximate finished height: 20 cm
- Hook size: 3.5 mm
- Main yarn: Super Bulky / Super Chunky velvet yarn
- Technique: Amigurumi crochet
- Skill level: Suitable for crocheters familiar with basic amigurumi techniques
Materials You Will Need
Before starting your crochet panda, gather all the materials needed for the project.
Yarn
You will need:
- Super Bulky / Super Chunky velvet yarn such as Himalaya Dolphin Baby, 100 g / 120 m, or an equivalent yarn.
- Dark color: approximately 35–40 g
- White color: approximately 25–30 g
- Fine / 4-ply yarn such as YarnArt Jeans, 50 g / 160 m, for the black facial details.
The total yarn consumption for the complete panda is approximately 60–70 g, although the amount may vary when using a different yarn brand.
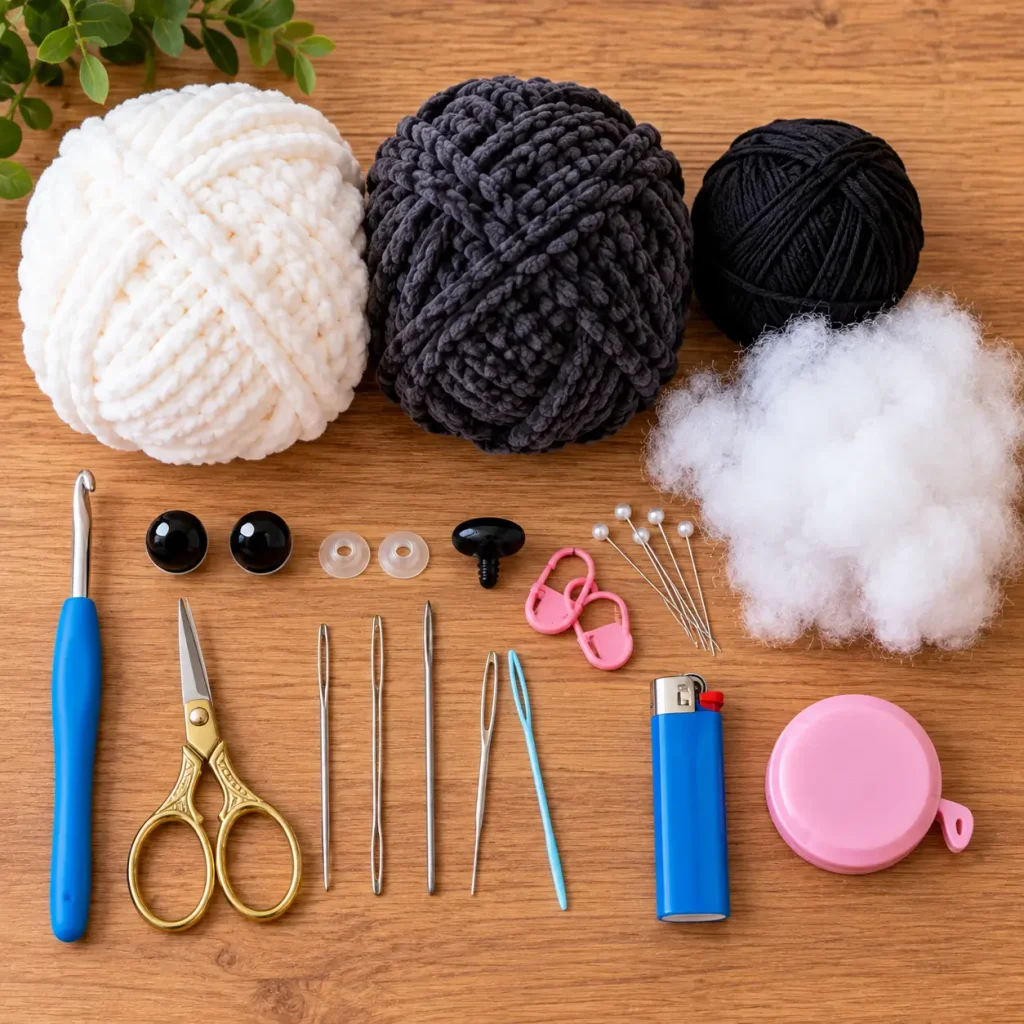
Crochet Hook and Accessories
You will also need:
- 3.5 mm crochet hook
- 16 mm safety eyes
- Safety nose, approximately 18 × 15 mm or 16 × 14 mm
- 8–10 cm long needle
- Strong needle for needle sculpting
- Sewing pins
- Fiberfill stuffing
- Needle with a wide eye
- Stitch marker
- Scissors
- Two knitting needles or long needles for positioning and fastening the head
- A lighter for carefully singeing plush yarn ends
Important Notes Before You Start
The finished size of the panda depends on your gauge, yarn weight, hook size, and crochet technique.
The original designer crocheted the sample using the “checkmark” method, and the finished toy measured approximately 20 cm.
It is recommended to use a hook no larger than 3.5 mm, or to crochet tightly enough that there are no visible holes in the fabric. This helps the finished plush toy look neat and professional.
Stuffing the Panda
The stuffing is important because it helps create the shape of the cheeks, tummy, and other rounded areas.
The head and body should be stuffed firmly, but without overfilling them. The arms and legs should only be stuffed in the areas specified in the pattern.
Finishing Plush Yarn Ends
For plush yarn, the designer recommends lightly singeing the yarn ends with a lighter to help prevent the fluffy fibers from coming loose.
Use extreme care when working with a flame and keep the lighter away from the finished toy except for the small yarn end being treated.
Crochet Abbreviations
The following abbreviations are used throughout the pattern:
- MR – Magic Ring
- CH – Chain
- SL ST – Slip Stitch
- SC – Single Crochet
- INC – Increase (make 2 SC in one stitch)
- DEC – Decrease (crochet 2 stitches together)
- *(…)6 – Repeat the instruction in brackets 6 times
- (N) – The number in brackets indicates the total number of stitches in the round
Baby Panda Crochet Pattern
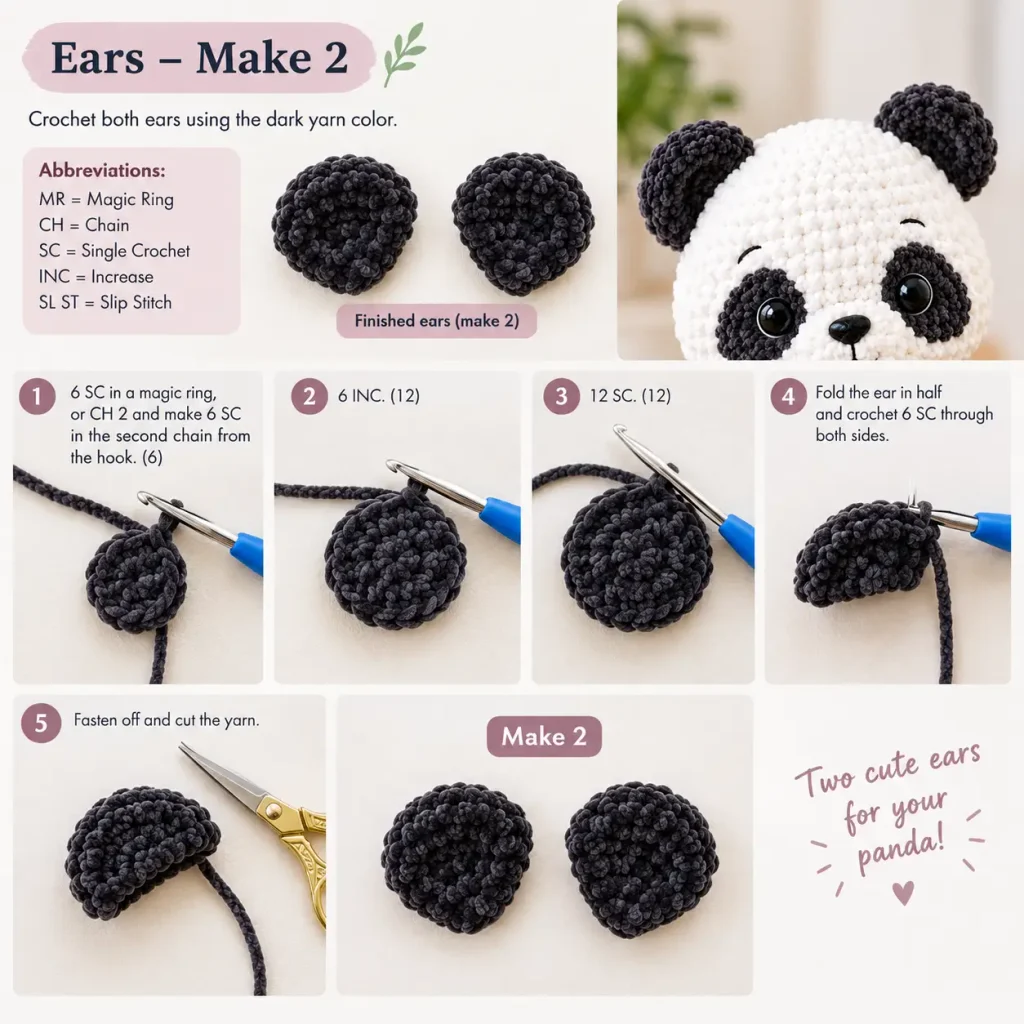
Ears – Make 2
Crochet both ears using the dark yarn color.
Round 1: 6 SC in a magic ring, or CH 2 and make 6 SC in the second chain from the hook. (6)
Round 2: 6 INC. (12)
Round 3: 12 SC. (12)
Fold the ear in half and crochet 6 SC through both sides.
Fasten off and cut the yarn.
Head
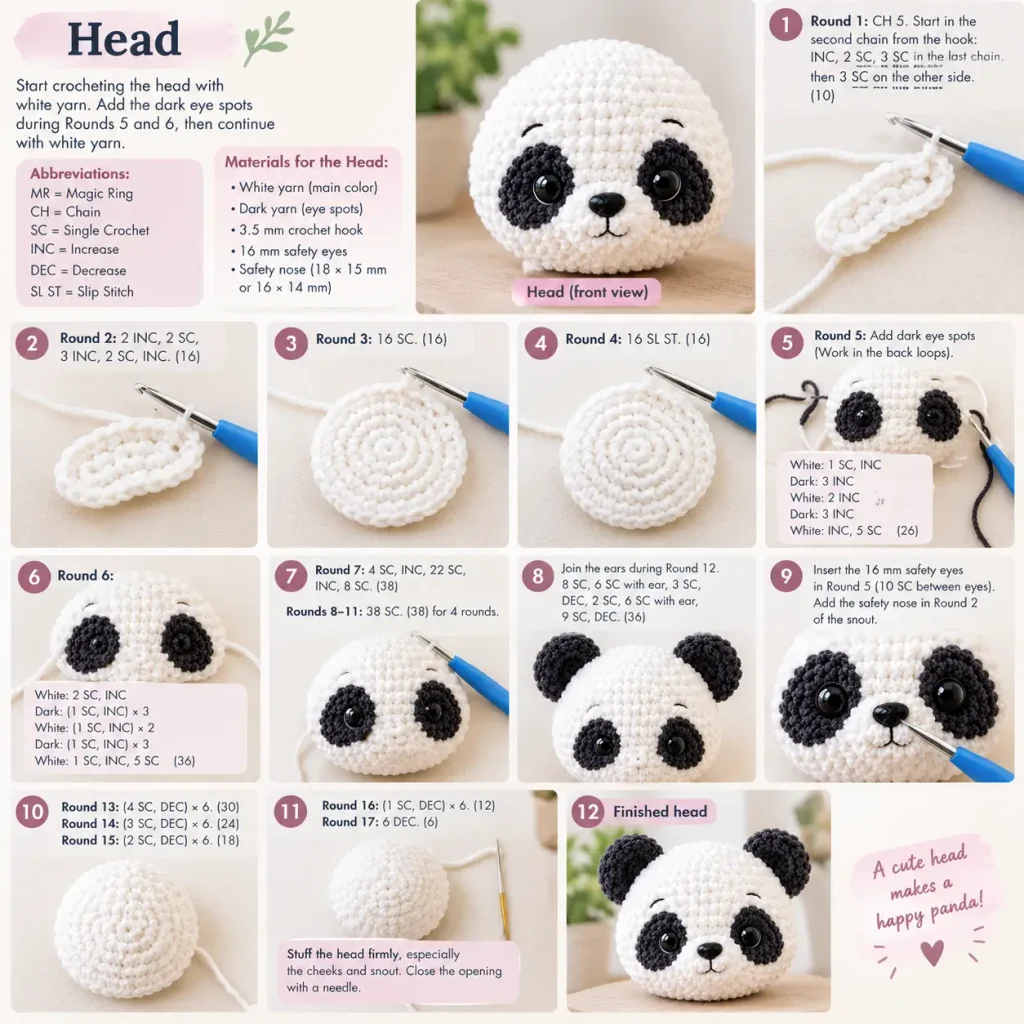
Start crocheting the head with the white yarn.
Round 1: CH 5. Starting in the second chain from the hook: INC, 2 SC, 3 SC in the last chain, then 3 SC on the other side of the chain. (10)
Round 2: 2 INC, 2 SC, 3 INC, 2 SC, INC. (16)
Round 3: 16 SC. (16)
Round 4: 16 SL ST. (16)
Adding the Panda Eye Spots
Round 5: Work in the back loops. At the same time, crochet the dark eye spots.
- White: 1 SC, INC
- Dark: 3 INC
- White: 2 INC
- Dark: 3 INC
- White: INC, 5 SC
Total: 26 stitches.
Round 6:
- White: 2 SC, INC
- Dark: (1 SC, INC) × 3
- White: (1 SC, INC) × 2
- Dark: (1 SC, INC) × 3
- White: 1 SC, INC, 5 SC
Total: 36 stitches.
Cut and fasten off the dark yarn. Continue crocheting with the white yarn.
Round 7: 4 SC, INC, 22 SC, INC, 8 SC. (38)
Rounds 8–11: 38 SC. (38) for 4 rounds.
Joining the Ears
Round 12: Join the ears during this round:
8 SC, 6 SC with the ear, 3 SC, DEC, 2 SC, 6 SC with the ear, 9 SC, DEC. (36)
Check the placement of the ears carefully. They should be evenly positioned in relation to the eyes and nose.
If necessary, adjust the position by crocheting the round again according to the pattern.
If joining the ears directly during this round does not give you an even result, you can leave them separate and sew them onto the finished head later.
Adding the Safety Eyes and Nose
Insert the 16 mm safety eyes in Round 5, leaving a distance of 10 SC between them when counting from the eye legs.
Before securing the eyes with their washers, make sure they are positioned evenly.
Insert the safety nose into Round 2 of the snout, slightly above the center rather than directly in the middle of the foundation chain.
Shaping and Closing the Head
Round 13: (4 SC, DEC) × 6. (30)
Round 14: (3 SC, DEC) × 6. (24)
Round 15: (2 SC, DEC) × 6. (18)
Now stuff the head with fiberfill.
Push the stuffing carefully into the snout so that it becomes nicely convex. Pay special attention to the cheeks. Pull the crocheted fabric slightly to the sides and stuff these areas well to create rounded cheeks.
The head should be stuffed firmly enough to allow you to perform the face needle sculpting later.
Round 16: (1 SC, DEC) × 6. (12)
Stuff the head completely.
Round 17: 6 DEC. (6)
Fasten off with a slip stitch, cut the yarn, and close the remaining opening with a needle.
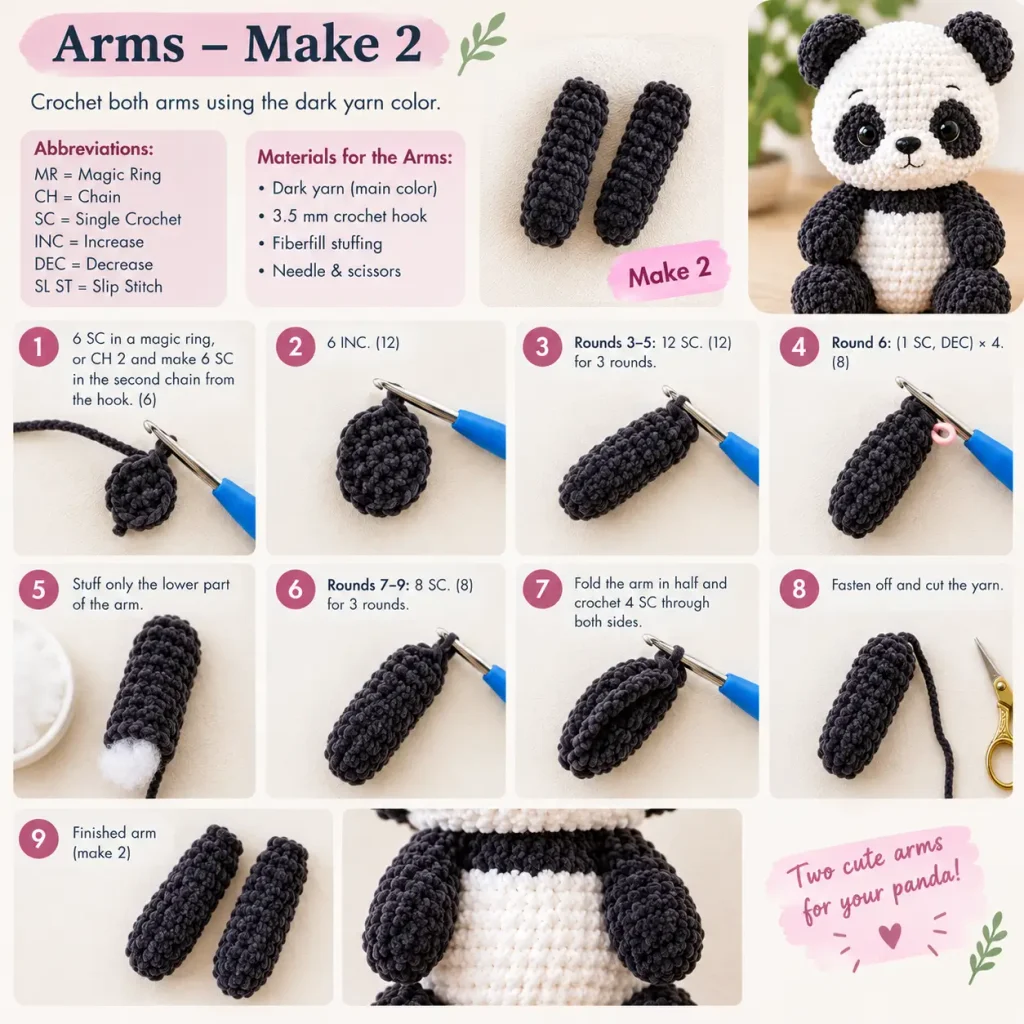
Arms – Make 2
Crochet both arms using the dark yarn.
Round 1: 6 SC in a magic ring, or CH 2 and make 6 SC in the second chain from the hook. (6)
Round 2: 6 INC. (12)
Rounds 3–5: 12 SC. (12) for 3 rounds.
Round 6: (1 SC, DEC) × 4. (8)
Stuff only the lower part of the arm.
Rounds 7–9: 8 SC. (8) for 3 rounds.
Fold the arm in half and crochet 4 SC through both sides.
Fasten off and cut the yarn.
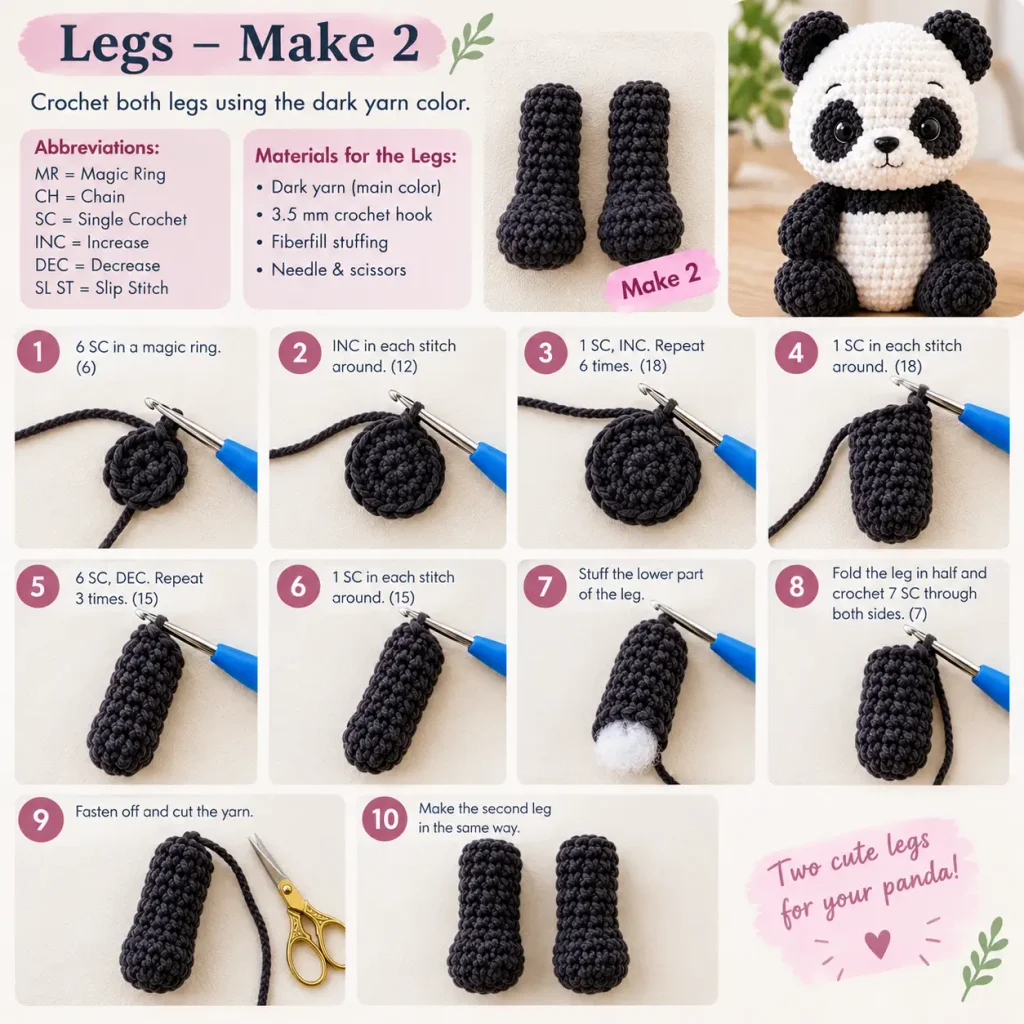
Legs – Make 2
Crochet both legs using the dark yarn.
Round 1: 6 SC in a magic ring, or CH 2 and make 6 SC in the second chain from the hook. (6)
Round 2: 6 INC. (12)
Round 3: (1 SC, INC) × 6. (18)
Round 4: (INC, 2 SC) × 6. (24)
Rounds 5–6: 24 SC. (24)
Round 7: 6 SC, 6 DEC, 6 SC. (18)
Round 8: 3 SC, 6 DEC, 3 SC. (12)
Rounds 9–11: 12 SC. (12) for 3 rounds.
Round 12: (4 SC, DEC) × 2. (10)
Stuff only the lower part of the leg.
Make 1–2 extra SC if necessary.
Fold the leg in half and crochet 5 SC through both sides.
Fasten off and cut the yarn.
Body
Start crocheting the body with the white yarn.
Round 1: 6 SC in a magic ring, or CH 2 and make 6 SC in the second chain from the hook. (6)
Round 2: 6 INC. (12)
Round 3: (1 SC, INC) × 6. (18)
Round 4: (INC, 2 SC) × 6. (24)
Round 5: (3 SC, INC) × 6. (30)
Round 6: 1 SC, INC, (4 SC, INC) × 5, 3 SC. (36)
Joining the Legs
Round 7: Join the legs during this round. The marker should pass at the back.
6 SC, 5 SC with the first leg, 14 SC, 5 SC with the second leg, 6 SC. (36)
Round 8: 36 SC. (36)
Round 9: (4 SC, DEC) × 6. (30)
Round 10: 30 SC. (30)
Round 11: 10 SC, 6 DEC, 8 SC. (24)
Check this round carefully. The six decreases should be evenly positioned in relation to the legs so that the finished body creates a rounded, bulging tummy.
If the decreases have shifted, adjust the round as needed.
Small differences can occur because each crocheter may have a different gauge, crochet angle, or yarn weight.
Change from white to the dark yarn.
Round 12: 24 SC. (24)
Round 13: (2 SC, DEC) × 6. (18)
Joining the Arms
Round 14: Join the arms during this round:
4 SC, 4 SC with the first arm, 5 SC, 4 SC with the second arm, 1 SC. (18)
Check the position of the arms carefully. They should line up correctly in relation to the legs.
If necessary, adjust the round and crochet it again according to the pattern.
Crochet 1 SL ST, cut the yarn, and leave a long yarn tail for sewing the pieces.
Stuff the body with fiberfill.
Tail
Crochet the tail using the dark yarn.
Round 1: 6 SC in a magic ring, or CH 2 and make 6 SC in the second chain from the hook. (6)
Round 2: 6 INC. (12)
Round 3: 12 SC. (12)
Round 4: 6 DEC. (6)
Crochet 1 SL ST and cut the yarn, leaving a long yarn tail for sewing.
Stuff the tail.
Assembly
Once all the crocheted pieces are complete, it is time to shape the face and assemble your panda.
Face Needle Sculpting
Start the assembly by shaping the panda’s face with needle sculpting.
Use a needle of suitable length together with nylon thread or another strong thread.
The tighter the sculpting, the more pronounced the panda’s cheeks will become.
Insert the needle into Round 4 at Point A and bring it out through Point B, next to the eye.
Then insert the needle at Point C, also next to the eye, and bring it out through Point D, approximately one SC away from Point B.
Next, insert the needle again at Point A and bring it out at Point E, next to the other eye.
Insert the needle at Point F, next to the eye, and return it to Point A.
Take both ends of the thread and tighten them while gently pressing the eyes and muzzle with your fingers.
Continue adjusting the tension until you are happy with the shape of the face.
Tie a couple of knots and hide the thread ends inside the head.
Face Decoration
Using the black 4-ply YarnArt Jeans yarn and a suitable needle, embroider the panda’s:
- Eyelids
- Mouth
Take your time with the embroidery because these small details help give the panda its final expression.
Sew on the Tail
Sew the tail onto the body at approximately the level of Rounds 5–6.
Use the yarn tail that was left after crocheting the tail.
Sew the Head to the Body
Position the head carefully before sewing.
Use two knitting needles or long needles to outline and secure the correct position of the head.
The neck line should be positioned very close to the area where the muzzle was tightened during the face sculpting.
Sew the head securely using the remaining yarn tail from the body or another strong thread.
Finally, strengthen the neck area by adding fiberfill as needed.
Your Baby Panda Is Ready!
Congratulations! Your adorable crochet panda is now complete.
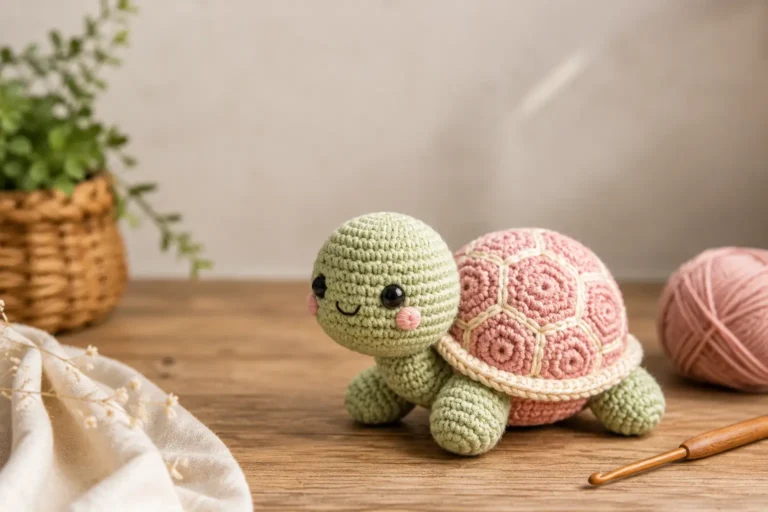
With its soft plush yarn, rounded cheeks, cute ears, and sweet embroidered facial details, this Baby Panda Amigurumi makes a lovely handmade crochet project. If you enjoyed this make, you might also like our Crochet Turtle Amigurumi Pattern for another beginner-friendly plush animal.
Remember that the final size and appearance can vary depending on your yarn, hook, gauge, stuffing, and crochet technique.
Happy crocheting!
Baby Panda Crochet Pattern – Quick Reference
Finished size: Approximately 20 cm Main yarn: Super Bulky / Super Chunky velvet yarn Hook: 3.5 mm Eyes: 16 mm safety eyes Nose: 18 × 15 mm or 16 × 14 mm Stuffing: Fiberfill Project type: Amigurumi / Crochet Plush Toy
Frequently Asked Questions
How big is the finished crochet panda?
The original sample is approximately 20 cm tall. However, the finished size depends on your yarn weight, hook size, gauge, and crochet technique.
What yarn is used for the Baby Panda?
The original pattern uses Himalaya Dolphin Baby Super Bulky/Super Chunky velvet yarn or an equivalent yarn. Dark yarn requires approximately 35–40 g and white yarn approximately 25–30 g.
What crochet hook size should I use?
A 3.5 mm crochet hook is specified in the pattern. The designer recommends not using a hook larger than 3.5 mm and maintaining a tight gauge to prevent holes in the finished plush.
What size safety eyes does the panda use?
The pattern specifies 16 mm safety eyes.
How much yarn do I need?
Approximately 60–70 g of yarn is enough for the complete toy, although yarn consumption may vary depending on the brand and individual crocheting style.
Why is stuffing important for this panda?
Proper stuffing helps create the rounded cheeks, snout, tummy, and overall shape of the panda. The head should be stuffed firmly enough to support the later needle-sculpting process.
Can I make the panda with another yarn?
The pattern indicates that an equivalent yarn can be used, but changing the yarn weight can affect the finished size and yarn consumption. Your gauge may also change, so the final dimensions may differ from the original sample.
Final Tips
For the best result:
- Keep your stitches tight enough to prevent stuffing from showing.
- Use a stitch marker to keep track of the beginning of each round.
- Check the position of the ears, eyes, arms, and legs before permanently securing them.
- Stuff the cheeks carefully to achieve a rounded facial shape.
- Take your time with needle sculpting because it strongly affects the final expression.
- Leave sufficiently long yarn tails when the pattern asks for them so the pieces can be sewn securely.
- Make sure the head is centered correctly before sewing it permanently to the body.
This Baby Panda Crochet Pattern is a fun project for creating a soft, cuddly handmade amigurumi panda that can become a sweet gift or a cute addition to your crochet collection. Looking for your next project? Check out our crochet bunny pattern for another adorable amigurumi idea.