Easy Crochet Hair Bandana: 5 Simple Steps to Make
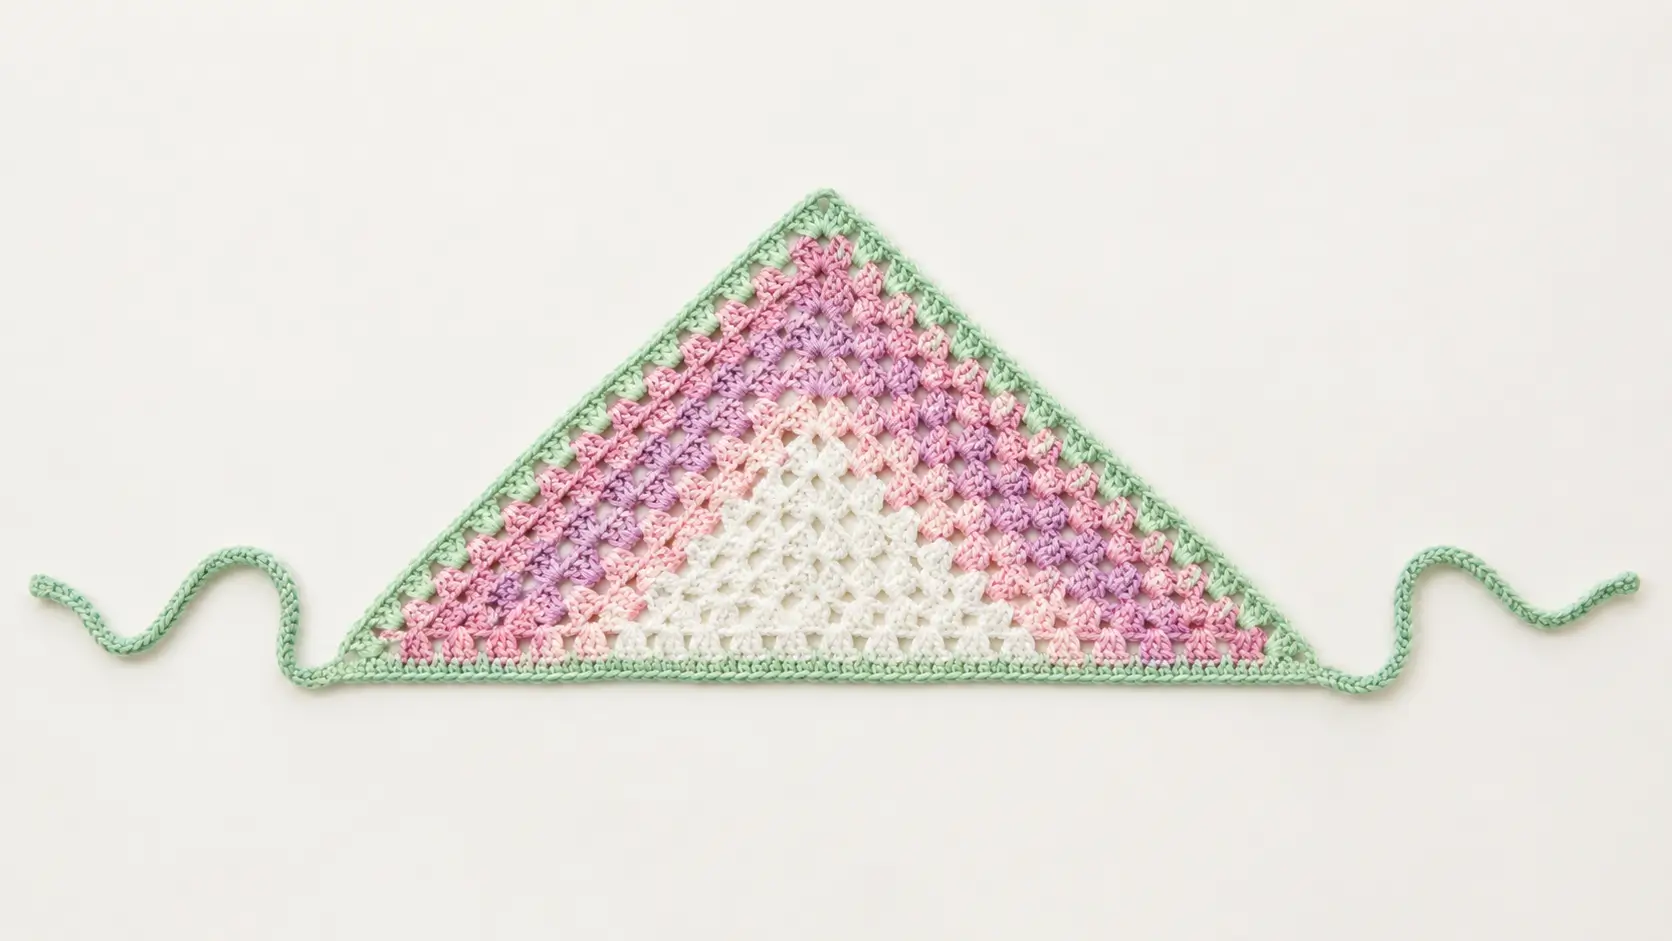
An easy crochet hair bandana is one of the most satisfying accessory projects you can make, and this guide breaks the whole pattern into five clear stages so it never feels overwhelming. Bandanas are a favorite summer project because they combine classic boho style with genuine function, keeping hair back during hot weather while adding a handmade touch to any outfit.
This easy crochet hair bandana pattern is written with extra explanation at every stage, especially around the corner increases that shape the triangle, since that detail is what keeps the finished piece lying flat rather than curling or puckering. It’s a great fit for beginners, gift-makers, or anyone looking for a relaxing project that uses just one skein of yarn. Below, you’ll find everything from picking the right yarn to the finishing techniques that give your bandana clean edges and secure ties.
Table of Contents
Project Overview
- Skill level: Easy
- Finished size: Approximately 11″ (28 cm) deep × 22″ (56 cm) long, excluding ties
- Yarn: 1 ball Caron Skinny Cakes (8.8 oz / 250 g, 795 yd / 727 m)
- Hook size: 5 mm (U.S. H/8)
This project uses just one ball of yarn from start to finish, making it an easy, low-commitment way to try shaping a triangle motif if you haven’t worked one before.
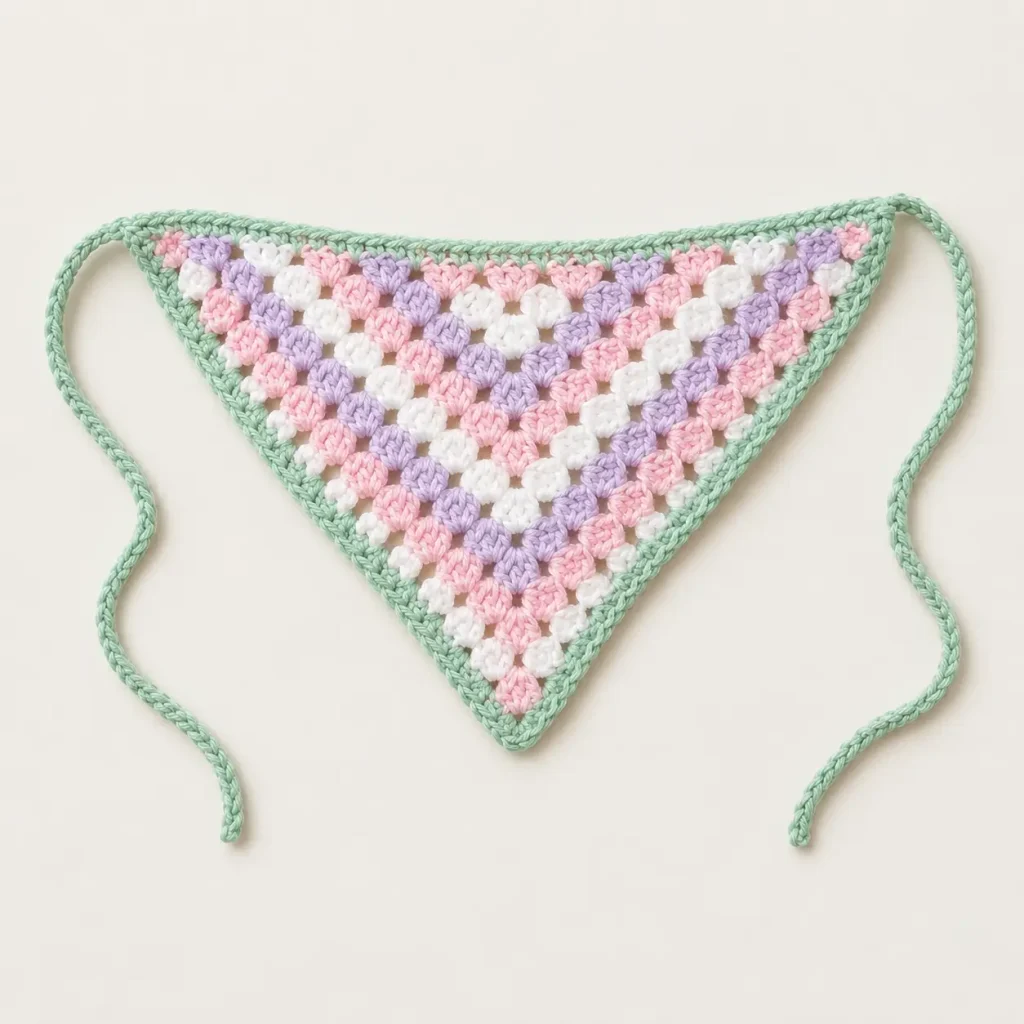
Why This Easy Crochet Hair Bandana Works
Several specific choices make this easy crochet hair bandana pattern reliable, even on a first attempt:
- Starting from a small ring keeps the tip neat. Beginning with a chain-5 ring rather than a flat foundation chain avoids the small gap that a straight starting edge often leaves at the point of the triangle.
- A chain-2 corner space drives consistent shaping. Working 3 dc, chain 2, 3 dc into the same corner space every row is what keeps the triangle’s increase rate even, so the finished shape doesn’t skew to one side.
- Chain-1 spaces between groups create natural texture. The small gaps between double crochet groups aren’t just structural — they give the finished fabric a slightly lacy, breathable texture that suits warm-weather wear.
- Sewn-in ties add length without bulk. Rather than crocheting the ties as a continuous extension of the main triangle, working them as a separate long chain keeps the tie portion thin and comfortable to knot.
- Single crochet along the bottom edge locks stitches in place. This finishing row keeps the open edge from stretching out of shape with repeated wear.
Choosing the Right Yarn & Hook
For this easy crochet hair bandana, a self-striping cake-style yarn like Caron Skinny Cakes works especially well, since it produces gradual color transitions across the triangle without any color-change work on your part. A 5mm (H/8) hook paired with this yarn weight produces a fabric with enough drape to tie comfortably, while still holding the triangle shape well.
When buying yarn, a cake-style or self-striping skein is the easiest option for a beginner, since it removes the need to manage multiple balls or plan stripes manually. If you prefer a solid color instead, any DK-to-worsted weight yarn with good stitch definition works as a substitute.
Acceptable substitutions: a standard worsted weight acrylic or cotton-acrylic blend works fine if a cake-style yarn isn’t available — just confirm you have enough total yardage (roughly 795 yards) to complete the full triangle and ties.
Materials & Prep
This easy crochet hair bandana uses a short, simple materials list.
Main materials:
- 1 ball Caron Skinny Cakes (8.8 oz / 250 g, 795 yd / 727 m), or an equivalent yarn with similar yardage
- 5mm (U.S. H/8) crochet hook
- Yarn needle
Gauge:
- 15 sc and 16 rows = 4″ (10 cm)
- 5 dc groups and 9 rows = 4″ (10 cm)
Prep essentials:
- Check your gauge with a small swatch before starting — this pattern isn’t tightly dependent on exact gauge, but a significantly looser or tighter tension will change your final finished size.
- Familiarize yourself with these abbreviations: ch (chain), dc (double crochet), sc (single crochet), sl st (slip stitch), RS (right side), sp (space), beg (beginning), rep (repeat), pat (pattern).
Step-by-Step Instructions
Follow this easy crochet hair bandana pattern one stage at a time — starting ring, increase rows, repeat rows, and ties — rather than rushing through the corner shaping.
Step 1: The Starting Ring
- Chain 5. Join with a slip stitch to the first chain to form a ring.
- Row 1: Chain 3 (counts as the first dc). Work 2 dc, chain 2, and 3 dc into the ring. Turn.
Pro tip: pull the starting ring snug before working Row 1 — a loose ring leaves a visible gap at the very tip of the finished triangle.
Step 2: Establishing the Corner Pattern
- Row 2: Chain 3. Work 2 dc into the first dc. Chain 1. In the corner chain-2 space, work 3 dc, chain 2, and 3 dc. Chain 1. Work 3 dc into the last dc. Turn.
- Row 3: Chain 3. Work 2 dc into the first dc. Chain 1. Work 3 dc into the next chain-1 space. Chain 1. In the corner chain-2 space, work 3 dc, chain 2, and 3 dc. Chain 1. Work 3 dc into the next chain-1 space. Chain 1. Work 3 dc into the top of the beginning chain. Turn.
Secret Trick: always work the corner increase (3 dc, ch 2, 3 dc) into the same chain-2 space from the previous row, not into the chain-1 spaces beside it — mixing these up is the most common reason the triangle stops increasing evenly.
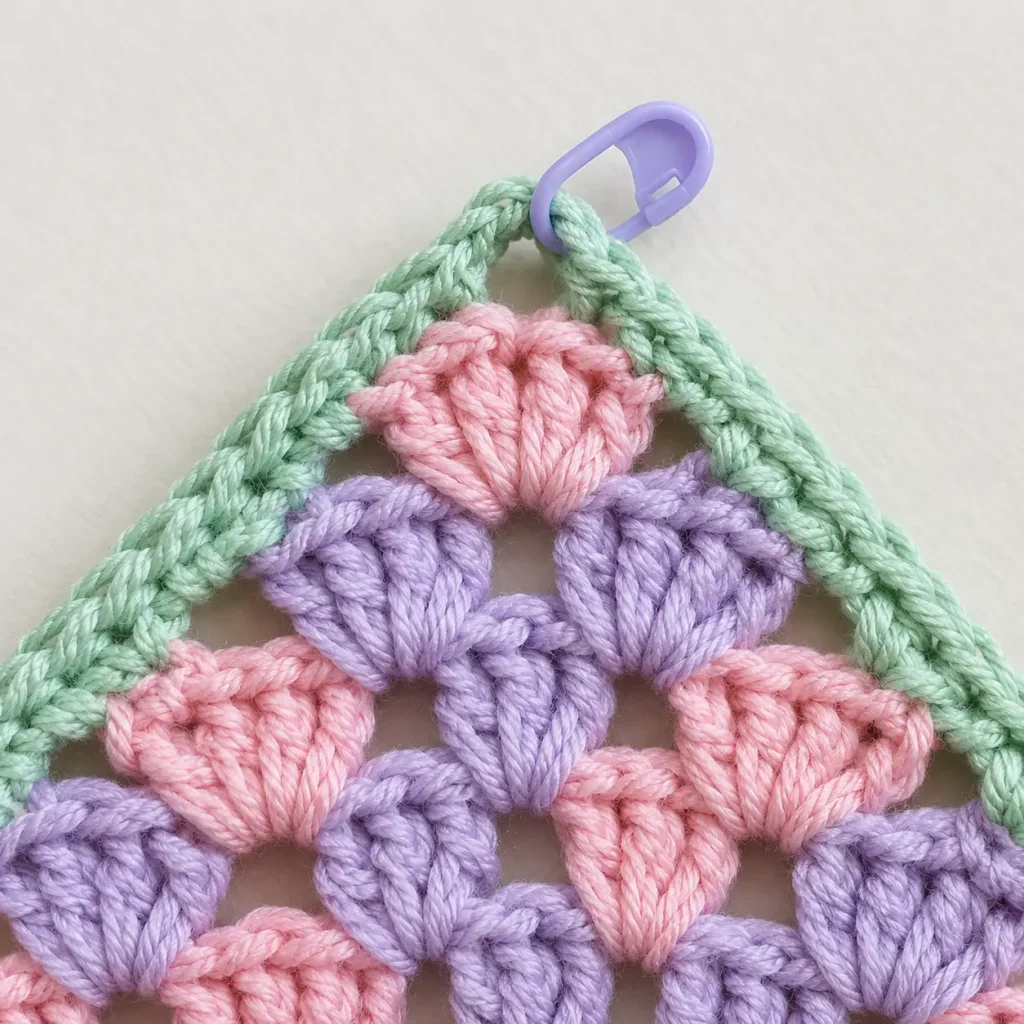
Step 3: Repeating the Increase Row
- Row 4: Chain 3. Work 2 dc into the first dc. Repeat: chain 1, then 3 dc in the next chain-1 space, working across until you reach the corner. In the corner chain-2 space, work 3 dc, chain 2, and 3 dc. Continue with chain 1 and 3 dc in each following chain-1 space until the beginning chain is reached. Work 3 dc into the top of the beginning chain. Turn.
- Continue repeating this same increase row pattern for every following row until the bottom edge measures approximately 22″ (56 cm). Fasten off.
Pro tip: measure the bottom edge every 4-5 rows rather than only near the end — this lets you confirm you’re on track for the full 22″ length before you’ve committed to many more rows.
Doneness check: lay the triangle flat on a table before fastening off — if the corner point looks noticeably off-center, double-check that your corner increases have landed in the same spot every row.
Step 4: Preparing for the Ties
- With the right side facing, work 1 row of single crochet evenly across the bottom edge of the bandana.
Pro tip: working this sc row through both loops, with even spacing, is what keeps the bottom edge from stretching or rippling once the ties pull on it.
Step 5: Adding the Ties
- Chain 51 and turn.
- Work 1 sc into the second chain from the hook, then 1 sc into each of the next 49 chains.
- Continue with 1 sc across the bandana’s bottom edge.
- Finish with 1 sc in each of the next 50 chains.
- Fasten off.
Resting step: before weaving in ends, tie the finished bandana around your head (or a similarly sized form) to confirm the tie length feels comfortable — it’s much easier to add a few extra chains now than to redo the ties after everything is woven in.
Pro Tips
These tips will help this easy crochet hair bandana come out neat and well-shaped:
- Keep your corner chain-2 spaces loose enough to work into easily. A too-tight corner space makes it difficult to fit 3 dc, ch 2, 3 dc into it cleanly on the following row.
- Count your chain-1 spaces each row before starting the next one. Since each row adds one more “group” on either side of the corner, losing count early compounds across the remaining rows.
- Use a stitch marker on the corner chain-2 space. Marking the actual corner (not just counting stitches) makes it much faster to find exactly where to work the next corner increase.
- Block the finished triangle before adding ties. A light steam or damp-and-shape treatment helps the piece lie flat, especially if the edges show any waviness from tension changes.
- Save leftover yarn for smaller projects. Any yarn left over from this easy crochet hair bandana works well for a matching crochet flower pattern accent sewn onto one corner, or a simple crochet bookmark pattern in a coordinating color.
Storage & Care
Store your finished bandana folded flat in a drawer rather than hung, which helps it keep its triangle shape over time. If it needs cleaning, hand wash gently in cool water with a mild detergent, since the self-striping yarn’s colors may be more prone to shifting in a washing machine. Reshape while damp and lay flat to dry, gently stretching the corner points back into place if needed.
Pattern Variations
This easy crochet hair bandana adapts easily to a few simple changes:
- Solid color version: Swap the self-striping yarn for a single solid color for a more minimalist, everyday look.
- Shorter ties: Reduce the starting chain for each tie (from 51 down to around 35-40) for a more fitted, less dramatic tie length.
- Added trim: Work a simple shell-stitch edging along the top point of the triangle for extra texture, similar to the kind of embellishment used in the crochet flower ideas roundup.
Gift & Styling Suggestions
A finished piece from this easy crochet hair bandana makes a versatile, giftable accessory:
- Pair it with a handmade crochet bunny or crochet flower pattern pin for a themed gift set.
- Choose bright, festival-style colors for a summer concert or outdoor event accessory.
- Make a few in different colorways as coordinating gifts for a friend group or bridal party.
- Tie it around a sunhat or basket as a decorative accent rather than wearing it.
FAQ
How long does an easy crochet hair bandana take to finish?
Most beginners complete this project across 2-3 hours of crocheting time, with the increase rows and ties being the two main stages to budget time for.
Why does my triangle look lopsided instead of symmetrical?
This usually happens when the corner increase (3 dc, ch 2, 3 dc) isn’t worked into the exact same chain-2 space each row — double-check that you’re increasing at the corner, not at a chain-1 space nearby.
Can I use a different yarn weight than Caron Skinny Cakes?
Yes — any DK to worsted weight yarn with similar total yardage works, though your gauge and finished size may shift slightly depending on the exact yarn used.
Do I need to block this bandana before wearing it?
It’s not required, but a light steam helps the edges lie flatter and gives the finished piece a more polished look, especially if you notice any waviness after finishing.
Is this easy crochet hair bandana suitable for a complete beginner?
Yes — it uses only basic double crochet and single crochet stitches, with the main new skill being the corner increase technique, which becomes intuitive after the first couple of rows.
Conclusion
This easy crochet hair bandana proves that a boho-chic accessory doesn’t require advanced techniques — five manageable stages take you from a small starting ring to a finished, wearable triangle with secure ties. If you’d like to see how other designers approach the same basic shape, the Mdays Crochet Bandana Pattern on Etsy is a well-reviewed, bestselling reference worth checking out for inspiration. Whichever version you make, this easy crochet hair bandana is a satisfying, practical accessory for warm-weather wear.